DevOps Basics: Production Terraform
In the last post, we added CI via GitHub Actions to our fork of the Microservices Demo.
The next step is Infrastructure deployment. There are many infrastructure-as-code tools, and we start with Terraform. It’s a standard these days.
Terraform is so robust that it lets you manage cloud infrastructure and VM configuration, database configuration, GitHub repositories, etc.
As for the cloud provider for this particular post, I’ve chosen Digital Ocean because of its simplicity. We’ll be exploring major cloud providers in future posts.
So, there are a few concepts you need to understand to work with Terraform.
Terraform Provider
The provider is a library that bridges Terraform and a tool you want to manage. Here’s the list of all providers - link
Most providers need credentials, so documentation specifies what a given provider needs to run.
Terraform Commands
- Init
- Plan
- Apply
terraform init is npm install for terraform. You download your dependencies and connect to the remote backend.
terraform plan gives you an idea of what Terraform is about to do to your infrastructure (you can save the plan as an artifact of your job to pass it to the specific deployment job).
Terraform builds a graph that specifies which resources to create first and what values need to be computed. You can specify implicit and explicit resource dependencies so you don’t end up in a “chicken-and-egg” scenario.
terraform apply either executes the plan by itself or uses the plan you provided as the input.
Terraform Syntax
Terraform is written in HCL (or JSON). HCL provides a simplified syntax and a few functions to write code conveniently.
Terraform doesn’t care about what files you put it in as long as it’s *.tf
Let’s explore basic constructions
Here’s the base variable:
variable "type" {
  type        = string
  default     = "app"
  description = "Infrastructure type, can be either app or shared"

  validation {
    condition     = contains(["shared", "app"], var.type)
    error_message = "Type must be either app or shared"
  }
}
You define a variable via variable and give it a name type and set some parameters. They are pretty descriptive. The minimal syntax to define a variable is:
variable "type" {}
Here’s the documentation for it - link
The following basic construction is local. They are just local variables, and you don’t provide a value for them. The value is computed during the plan execution:
locals {
 is_app = var.type == "app"
}
You can access the local variable value using:
local.is_app
You cannot reference locals in variables, but you can reference variables in locals.
You can also use terraform functions in locals but not in variables. Here’s the documentation for it - link
The following basic construction is a data resource:
data "digitalocean_account" "example" {}
Data resources are read-only and an excellent way to fetch something from the cloud/data/etc. In the example, we’re fetching a current digital ocean account.
You can refer to other terraform projects this way. Here’s the documentation - link
Then the key resource is:
resource "digitalocean_project" "environment" {
  count       = local.is_shared
  name        = local.prefix
  description = "A project to represent ${local.env} resources."
  purpose     = "Web Application"
  environment = local.env
}
This lets us create something in the cloud via terraform - a resource. The syntax is the same as with data, but it’s not read-only. Here’s the documentation - link
In general, you can see the syntax description here - link
Terraform State
It’s a JSON file where Terraform keeps track of the resources and configurations it manages. It gives Terraform the power to calculate the difference between the real-world infrastructure & configuration versus what you have in the code and the state to see precisely what needs to be modified.
You can read more about it here - link.
Another important part is Terraform Workspaces. Workspace is the separate state file that is managed by the same code, so we can use the same code to deploy our infra multiple times using workspaces, and they all will have their won state. Here is the documentation - link
Other helpful topics to know about:
It’s important to note that infrastructure development is drastically different from regular product development because every change to infrastructure could potentially destroy things, so it’s not easy to rename stuff or change configuration at will. Infrastructure development must be much more planned, and there needs to be more room for mistakes.
Terraform Projects Development
There are multiple ways to structure your terraform code. There’s some guidance, but mostly, it’s like JS - you can do whatever you want.
There are 2 dimensions: people & code.
People Structure
I like to think of 3 ways to develop infrastructure from the people’s perspective:
- Store it centrally and have a dedicated team manage it
- Store shared parts and modules separately, but store “application/service” is a specific terraform that uses shared modules alongside the code and has the product team manage their infrastructure.
- Store & manage all the terraform separately, and give product teams small configuration files to provide what they need
All approaches work well. Problems are always at scale. When your organization is small, you can work well with a few people managing all your terraform, and they won’t be a bottleneck. A standard these days is letting your product teams manage their infrastructure and providing them with shared infrastructure and modules. It’s a good way to manage infrastructure for small- and medium-sized organizations. The downside is that you need team members who can develop infrastructure.
When you don’t have these people, it’s a recipe for a disaster. Infrastructure development has a different lifecycle and needs than regular product development, so if you approach it with a product mindset in this scenario, you not only reinvent the wheel but also make your terraform code unmaintainable in the long run. A good example is renaming variables or changing the configuration of resources and accidentally triggering recreation (renaming a database cluster, for example).
A relatively new approach is combining the first 2: you have a central team that manages all infrastructure but gives a product team a small configuration file to say what resources they need—kind of a Heroku way.
Code Structure
There’s a certain standard around how to structure your code. It’s well written here - link
It boils down to:
- Use inline submodules for complex logic
- Use separate directories for each application
- Split applications into environment-specific subdirectories
- Use environment directories
These points are valid for the first 2 approaches with people.
The 3rd one implies that we don’t give control over infrastructure resources to Product teams but rather give them a simple config, so it’s entirely up to us to design how we want to manage it.
In this article, we’ll go with the third approach because I like keeping the whole infrastructure in 1 place.
Digital Ocean
What’s our infrastructure?
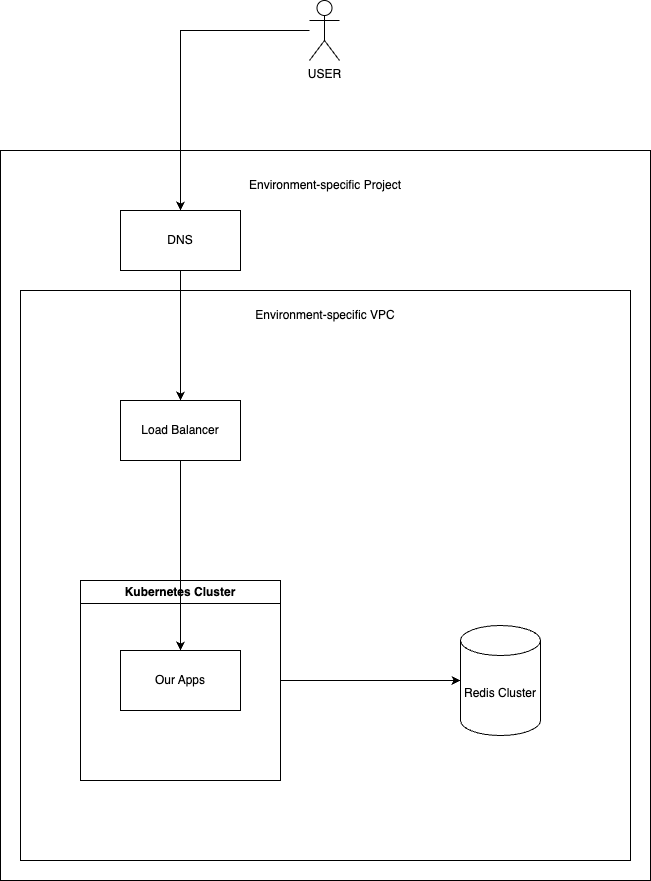
You can look at the microservices diagram and see 4 parts. We’ll cover 3 today.
- Shared Infrastructure (Network, Domain name, etc.)
- Redis for Cart service
- Load Balancer for Frontend
- Kubernetes
Typically, every project has some shared infrastructure. It can be a network or a shared secret. In our case, these are:
Then there’s app-specific infrastructure:
We’ll also have Kubernetes in the next post covering shared and app-specific infrastructure - link.
Project - is a fundamental abstraction to group resources together
VPC is a network to put our resources in. Digital Ocean Provides a Default network, but it’s a good practice to isolate resources in an environment-specific network
Domain Name - a base name for our application under the control of Digital Ocean
Load Balancer - to expose our Frontend to the world
Certificate - so we serve HTTPS instead of HTTP (must have these days)
Redis - our database for Cart Service.
The diagram is simple:
Prepare the Digital Ocean Account
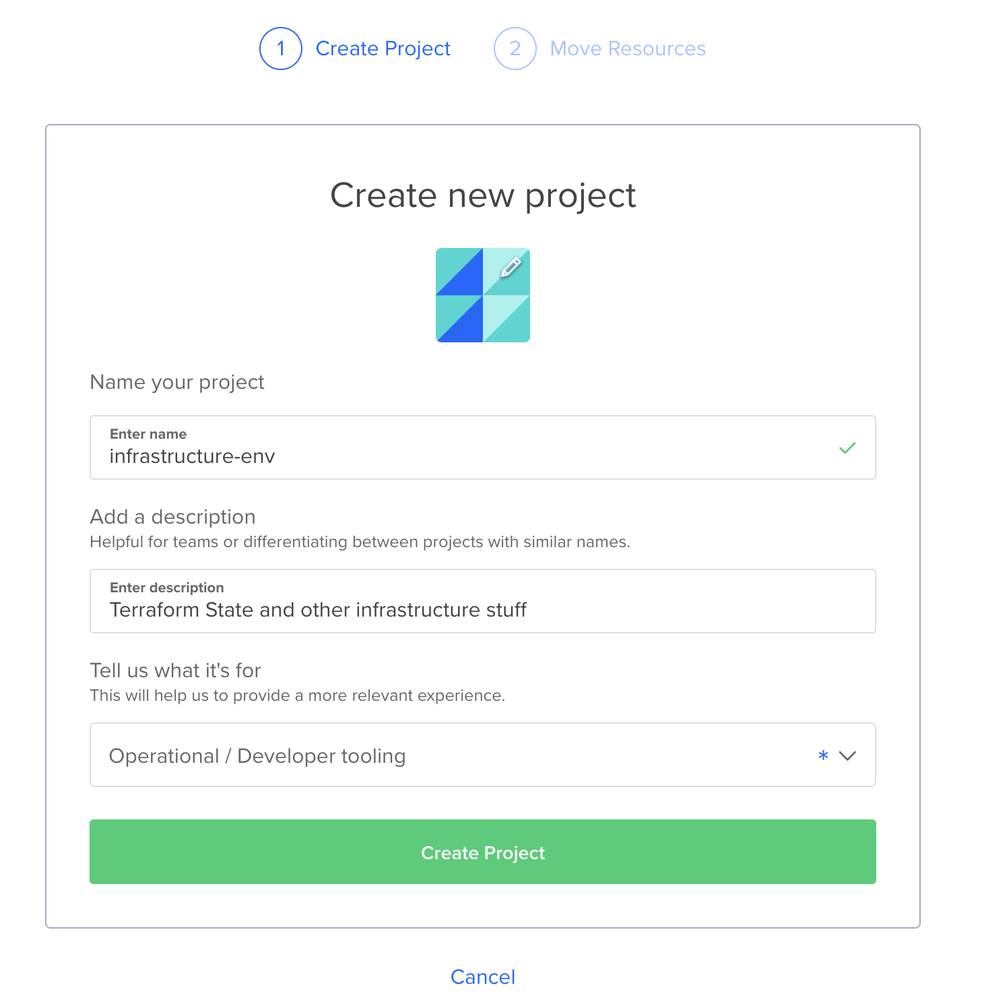
When you sign up, you’re asked to create a project. Let’s call it infrastructure-env.
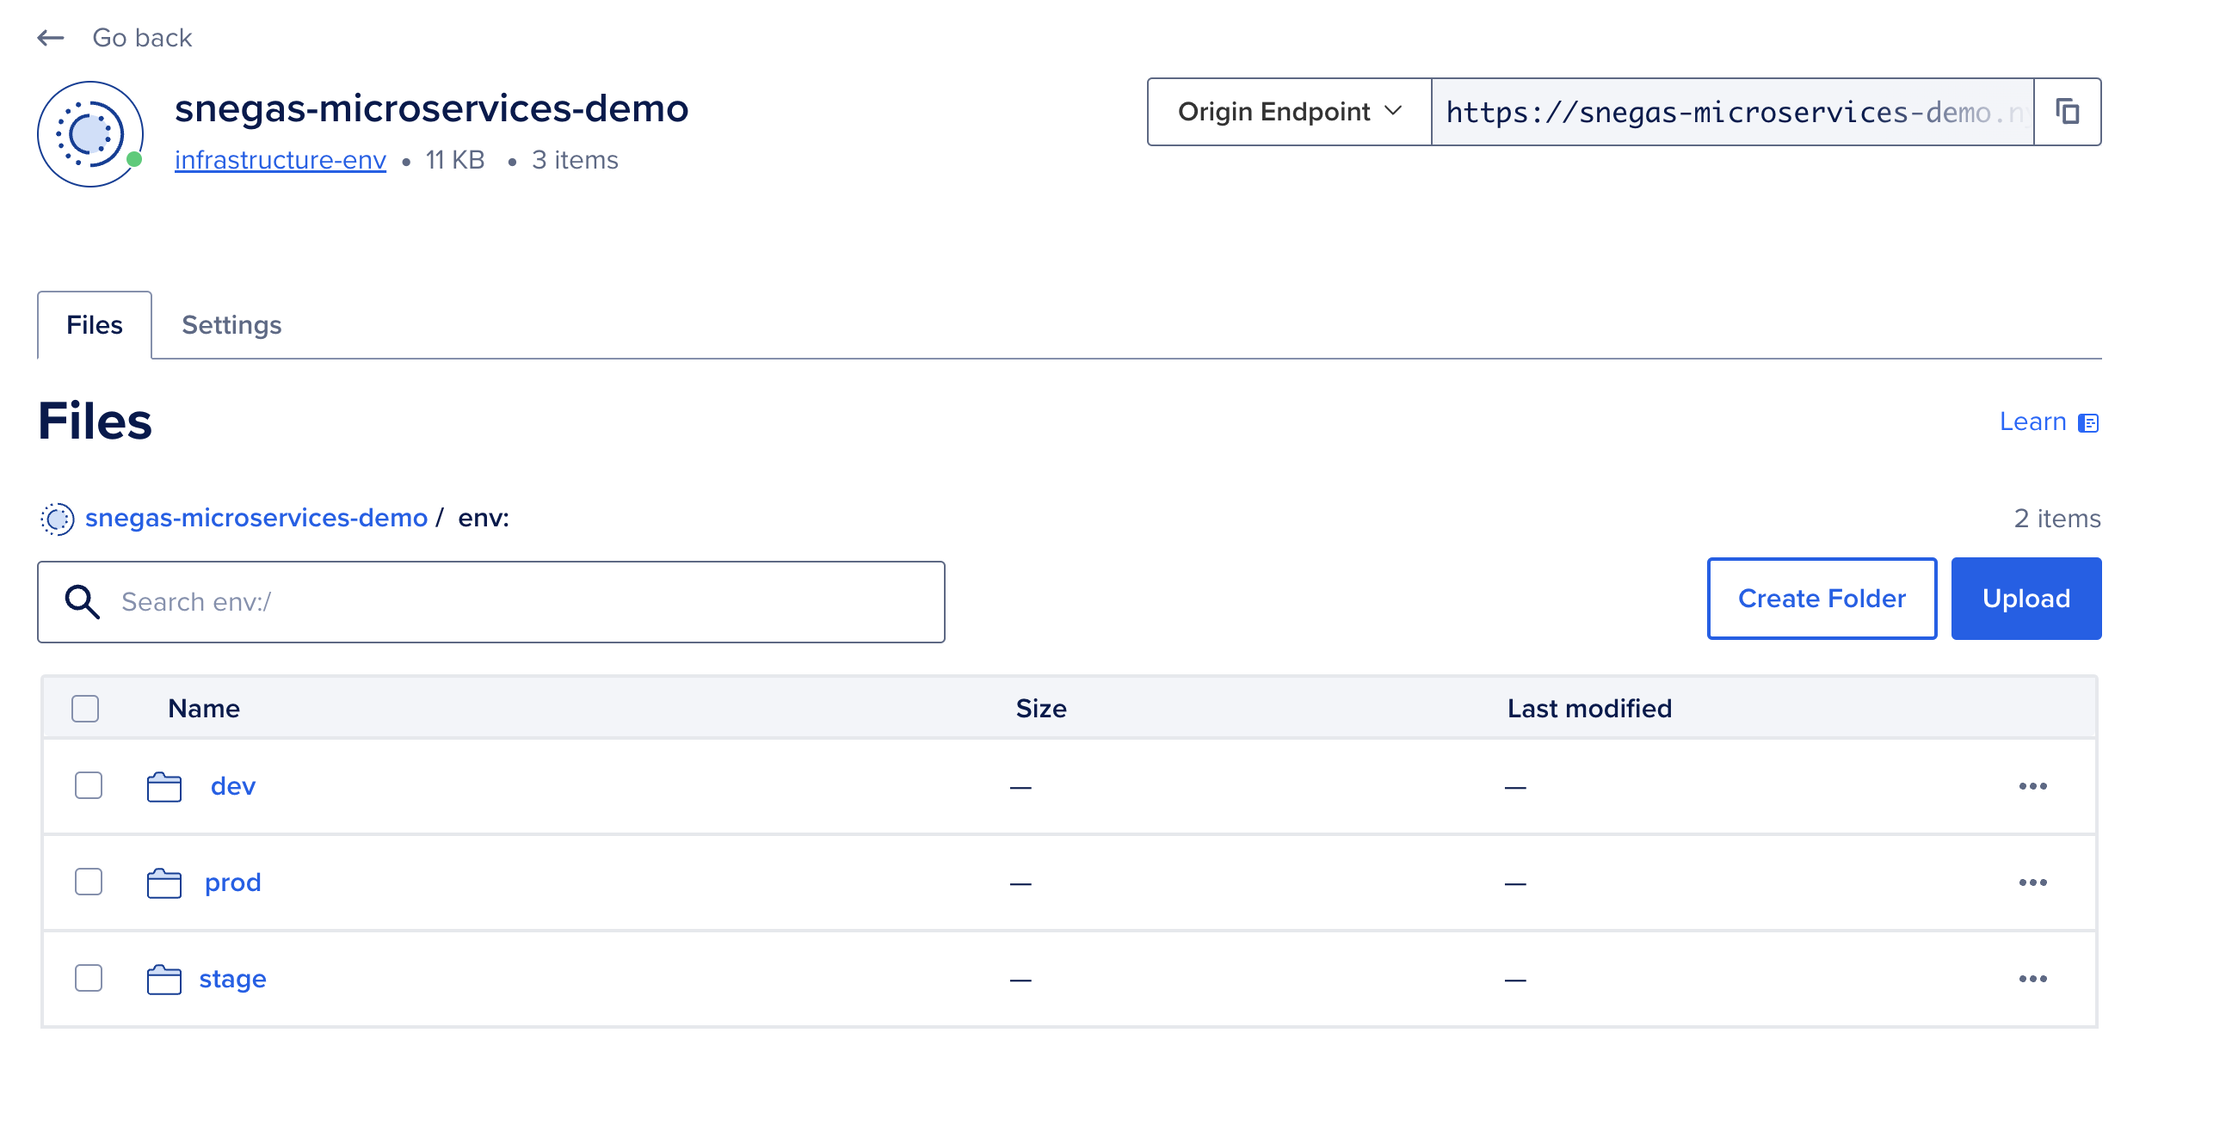
Then, let’s navigate to Spaces from the left menu and create a new Bucket
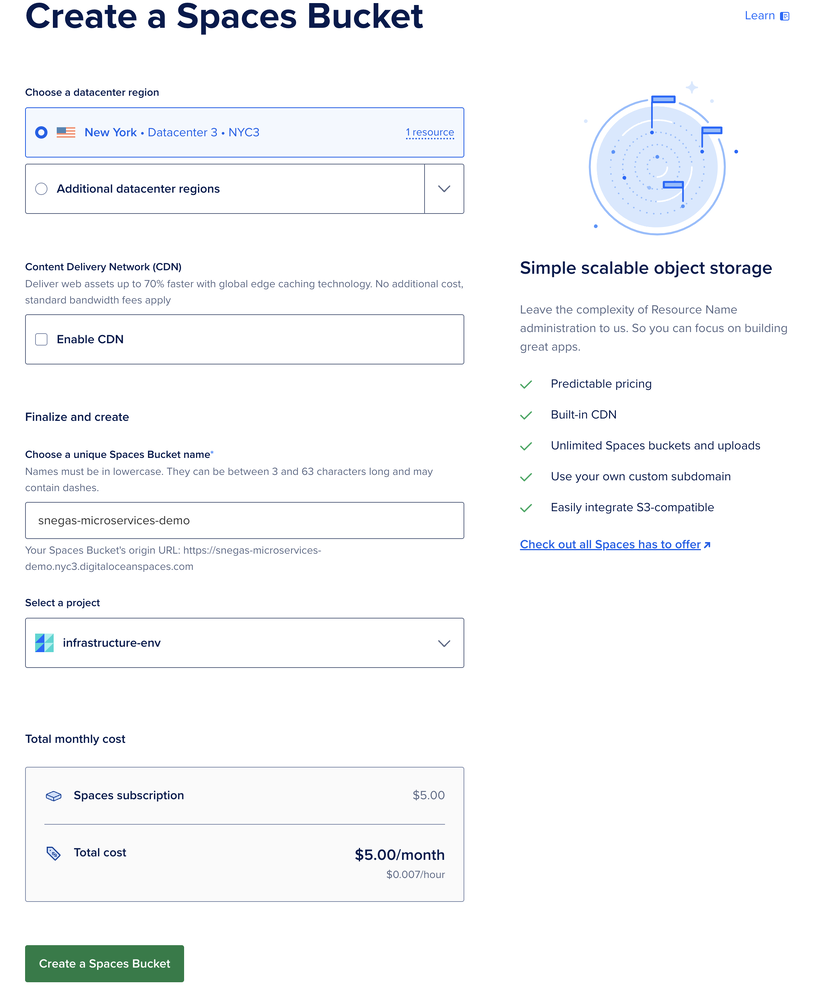
We’ll store our Terraform states in there. Now, navigate to APIs from the left menu and hit Generate New Token.
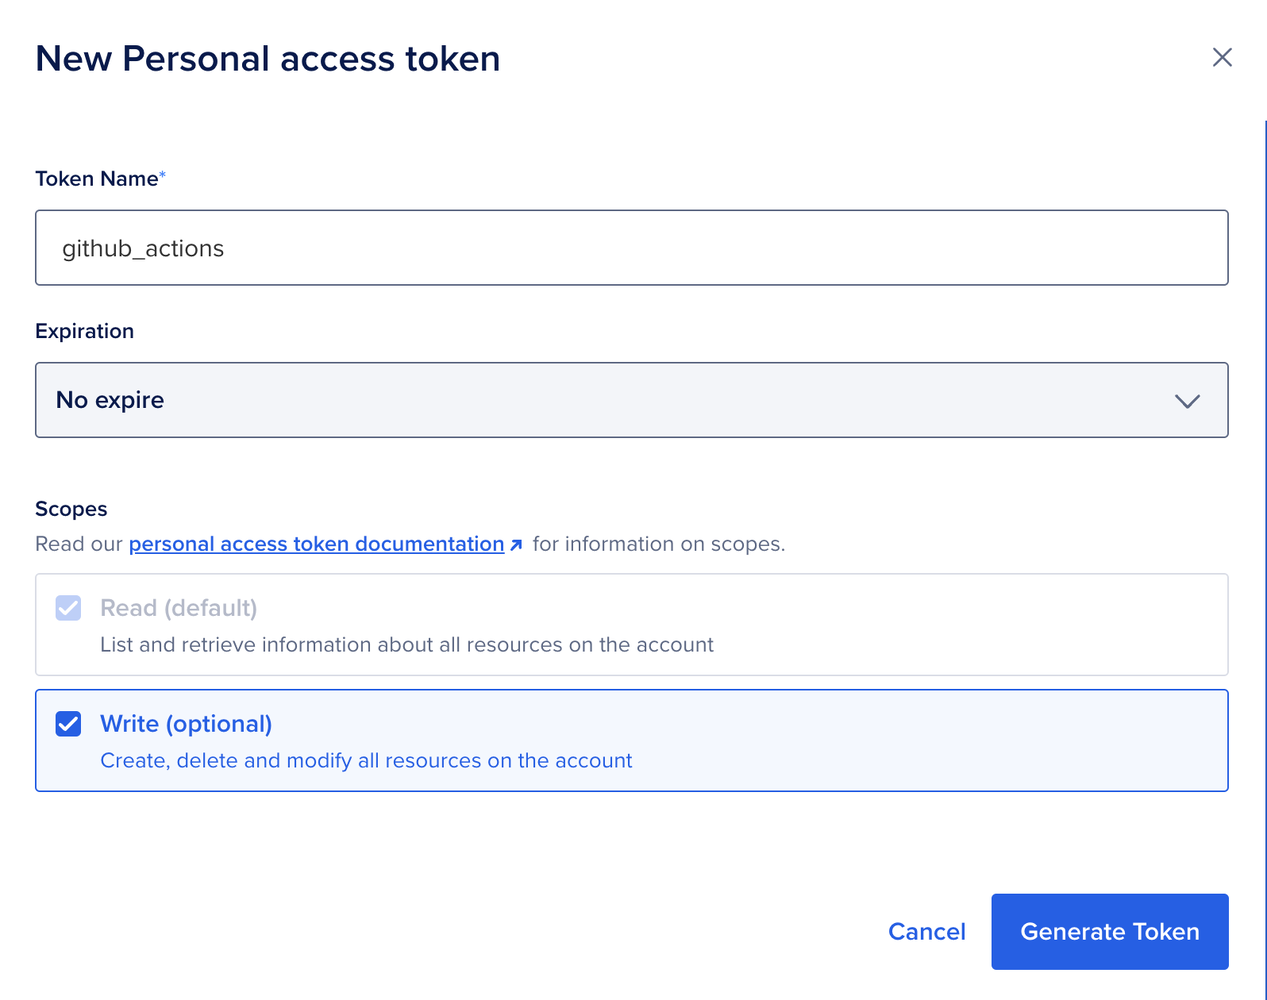
Then let’s go to GitHub Actions, our repo -> Settings -> Secrets and variables -> Actions. And let’s add a New repository secret named DIGITALOCEAN_TOKEN with the value from Digital Ocean.
Then, go back to DO and switch to the Spaces Keys tab. Hit generate a new key, give it a name, and you’ll be prompted with ACCES_KEY and SECRETS_KEY. So, let’s copy those and create new Secrets in Github called AWS_ACCESS_KEY_ID and AWS_SECRET_ACCESS_KEY, respectively. DO Spaces implement S3 API, so we’ll be using S3 Terraform Backend :) Here is the documentation on it - link
Now that’s it!
Let’s write some code.
Treating Terraform Configuration as a Product
Since our app is pretty simple, we also want configs to be simple. We don’t even want Product teams to know what infrastructure they are using. They don’t care much :)
- We also want to have 3 environments
- We don’t want to create separate configurations for all of them
- We want this to be embedded into the infrastructure code itself
We want the shared infra config to look like this:
type = "shared"
prefix = "infra"
base_domain = "microservices-demo.devopsbasics.systems"
The type will indicate if it’s an app or a shared infra. The default value will be app
The prefix will be the resources prefix. We’ll be combining it with the environment names.
The base_domain is a basic hosted zone we want to create. My goal is to use the base domain to create:
dev.${var.base_domain}zone for the dev environmentstage.${var.base_domain}zone for the stage environmentvar.base_domainfor the prod environment
You can get a domain name for your learning purposes cheaply (doesn’t matter where you bought it).
Also, we want to create a VPC if it’s the shared infrastructure implicitly.
For the app-specific infra, we want it to be simple as well.
# for cartservice
prefix="cartservice"
redis=true

# for frontend
prefix="frontend"
external=true
So, if there’s no type, we assume the default value of app And then, we can either create a Redis cluster, expose the app, do both, or do nothing :)
Also, we want infrastructure to have separate pipelines. Typically, you update infrastructure infrequently, and thus, there’s no need to apply anything.
So, we end up pipeline-heavy because it’s a mono repo :) (which is expected in the case of a mono repo).
Coding!
I’ve been writing the project while writing the infrastructure, so I stumbled across many small mistakes like syntax errors or wrong references. In the article you see the nice picture, but I’ll include some of the errors I faced along the way to show you that it’s OK to make silly mistakes.
Finally, it’s time to code. We start with a shared infra.
Let’s create ./src/shared-infra folder, and put app.auto.tfvars
app.auto.tfvars will indicate that this project has infrastructure!
type = "shared"
prefix = "infra"
base_domain = "microservices-demo.devopsbasics.systems"
Let’s then define the terraform code.
The idea is that we have EXACTLY the same code serving all projects. So we don’t have copy-pasta and make changes in a single place.
Let’s create ./infrastructure folder and put a few files in here
providers.tfwill store the configuration of our digital ocean providervariables.tfwill store all variablesproject.tfwill store our shared infrastructure
providers.tf looks like this
terraform {
  required_providers {
    digitalocean = {
      source  = "digitalocean/digitalocean"
      version = "~> 2.0"
    }
  }

  backend "s3" {
    endpoints = {
      s3 = "https://nyc3.digitaloceanspaces.com"
    }

    key                         = "terraform.tfstate"
    bucket                      = "snegas-microservices-demo"
    region                      = "us-east-1"
    skip_requesting_account_id  = true
    skip_credentials_validation = true
    skip_region_validation      = true
    skip_metadata_api_check     = true
    skip_s3_checksum            = true
  }
}

provider "digitalocean" {}
Here, we specify that we need the digital ocean provider to run this project.
We also set that we store our backend in S3. But we overwrite a few things:
endpoint- we repoint from the default AWS to Digital Oceanskip_*variables so we don’t get AWS errors because we call non-aws resources.
variables.tf looks like
variable "type" {
  type        = string
  default     = "app"
  description = "Infrastructure type, can be either app or shared"

  validation {
    condition     = contains(["shared", "app"], var.type)
    error_message = "Type must be either app or shared"
  }
}

variable "prefix" {
  type        = string
  description = "Prefix for all resources. Typically a project name"
}

variable "base_domain" {
  type        = string
  description = "DNS Hosted Zone you own and want to allocate as a base for the environments"
  default     = ""
}
We define the type, prefix, and base_domain. The only required variable is prefix
The project.tf is where things get interesting
locals {
  environment_base = {
    dev   = "Development"
    stage = "Staging"
    prod  = "Production"
  }

  is_shared = var.type == "shared" ? 1 : 0
  env       = local.environment_base[terraform.workspace]

  prefix = "${terraform.workspace}-${var.type}-${var.prefix}"

  base_domain = terraform.workspace == "prod" ? var.base_domain : "${terraform.workspace}.${var.base_domain}"
}

resource "digitalocean_project" "environment" {
  count       = local.is_shared
  name        = local.prefix
  description = "A project to represent ${local.env} resources."
  purpose     = "Web Application"
  environment = local.env
}

resource "digitalocean_vpc" "default" {
  count  = local.is_shared
  name   = "${local.prefix}-vpc"
  region = "nyc3"
}

resource "digitalocean_domain" "default" {
  count = local.is_shared
  name  = local.base_domain
}

resource "digitalocean_project_resources" "environment" {
  count   = local.is_shared
  project = digitalocean_project.environment[0].id
  resources = [
    digitalocean_domain.default[0].urn
  ]
}
Let’s unpack these
First of all, locals
environment_base = {
    dev   = "Development"
    stage = "Staging"
    prod  = "Production"
  }

is_shared = var.type == "shared" ? 1 : 0
env       = local.environment_base[terraform.workspace]

prefix = "${terraform.workspace}-${var.type}-${var.prefix}"

base_domain = terraform.workspace == "prod" ? var.base_domain : "${terraform.workspace}.${var.base_domain}"
environment_basewill be used for Digital Ocean Project creation because it can have only “Development,” “Staging,” or “Production” as the environment.is_sharedis a way for us to determine if these resources need to be created at all.envis just a selected value from theenvironment_basebased on the workspace name.- We envision a workspace name to be an environment name (
dev,stage,prod) prefixis a local that combines workspace name, type, and prefix variables.base_domainis a local variable for a DNS-hosted zone for an environment (like we discussed above).
Then, we create a project
resource "digitalocean_project" "environment" {
  count       = local.is_shared
  name        = local.prefix
  description = "A project to represent ${local.env} resources."
  purpose     = "Web Application"
  environment = local.env
}
We use count to determine if the resource needs to be created at all. So, a project won’t be created for the type app
Then, we create a VPC.
resource "digitalocean_vpc" "default" {
  count  = local.is_shared
  name   = "${local.prefix}-vpc"
  region = "nyc3"
}
It’s easy to create a VPC in Digital Ocean :)
The same is true for a DNS Hosted zone
resource "digitalocean_domain" "default" {
  count = local.is_shared
  name  = local.base_domain
}
Then we say that our domain is a part of the Digital Ocean Project we created earlier
resource "digitalocean_project_resources" "environment" {
  count   = local.is_shared
  project = digitalocean_project.environment[0].id
  resources = [
    digitalocean_domain.default[0].urn
  ]
}
Do you see how we referenced both the project and domain with [0] ?
It’s because of count
If the resource is created, it’s created in a list. The first element of the list has an index of 0.
You can check my commits history to see how many tries it took my to get it working due to the silly syntax errors.
Pipelines
Now, it’s time to do pipelines!
I put _infra-pr.yml ,and _infra-main.yml in the .github/workflows folder.
on:
  workflow_call:
    inputs:
      project:
        required: true
        type: string
      env:
        required: true
        type: string

env:
  AWS_SECRET_ACCESS_KEY: $
  AWS_ACCESS_KEY_ID: $
  DIGITALOCEAN_TOKEN: $

jobs:
  terraform-pr-plan:
    runs-on: ubuntu-latest
    steps:
      - name: Checkout
        uses: actions/checkout@v4
      - name: Terraform Setup
        uses: hashicorp/setup-terraform@v3
      - name: Prepare
        working-directory: ./src/$
        run: |
          cp -a ../../infrastructure/. ./
      - name: Prepare
        working-directory: ./src/$
        run: |
          terraform init -backend-config="key=$.tfstate"
          terraform workspace select -or-create $
      - name: Terraform Plan
        id: plan
        working-directory: ./src/$
        run: |
          terraform plan -no-color
        continue-on-error: true
      - name: Push PR Comment
        uses: actions/github-script@v6
        if: github.event_name == 'pull_request'
        env:
          PLAN: "terraform\n$"
        with:
          github-token: $
          script: |
            // 1. Retrieve existing bot comments for the PR
            const { data: comments } = await github.rest.issues.listComments({
              owner: context.repo.owner,
              repo: context.repo.repo,
              issue_number: context.issue.number,
            })
            const botComment = comments.find(comment => {
              return comment.user.type === 'Bot' && comment.body.includes('Terraform Plan for $')
            })

            // 2. Prepare format of the comment
            const output = `Terraform Plan for $ 📖\`$\`

            <details><summary>Show Plan</summary>

            \`\`\`\n
            ${process.env.PLAN}
            \`\`\`

            </details>

            *Pusher: @$, Env: \`$\`*`;

            // 3. If we have a comment, update it, otherwise create a new one
            if (botComment) {
              github.rest.issues.updateComment({
                owner: context.repo.owner,
                repo: context.repo.repo,
                comment_id: botComment.id,
                body: output
              })
            } else {
              github.rest.issues.createComment({
                issue_number: context.issue.number,
                owner: context.repo.owner,
                repo: context.repo.repo,
                body: output
              })
            }
For a PR, our flow is very simple
- we get the
projectname and env as inputs - we set environment variables from secrets to getting our terraform working properly
- We checkout the code
- Setup terraform
- Then, we copy the contents of the
./infrastructurefolder into the current folder withapp.auto.tfvarsto have the full terraform project in place - Then, we do
terraform initwith-backend-config="key=$.tfstate"to make sure we have different state file names for different projects - Then, we select a workspace based on the environment passed
- And run the plan
Then, we push the plan output as a comment into PR.
on:
  workflow_call:
    inputs:
      project:
        required: true
        type: string
      env:
        required: true
        type: string

env:
  AWS_SECRET_ACCESS_KEY: $
  AWS_ACCESS_KEY_ID: $
  DIGITALOCEAN_TOKEN: $

jobs:
  tf-plan:
    runs-on: ubuntu-latest
    steps:
      - name: Checkout
        uses: actions/checkout@v4
      - name: Terraform Setup
        uses: hashicorp/setup-terraform@v3
      - name: Prepare
        working-directory: ./src/$
        run: |
          cp -a ../../infrastructure/. ./
      - name: Prepare
        working-directory: ./src/$
        run: |
          terraform init -backend-config="key=$.tfstate"
          terraform workspace select -or-create $
      - name: Dev Plan
        id: plan
        working-directory: ./src/$
        run: |
          terraform plan -no-color -out $-plan.tfplan
      - name: Archive production artifacts
        uses: actions/upload-artifact@v4
        with:
          name: $-tfplan
          path: |
            src/$/$-plan.tfplan
  tf-apply:
    needs: [tf-plan]
    runs-on: ubuntu-latest
    environment: $
    steps:
      - name: Checkout
        uses: actions/checkout@v4
      - name: Terraform Setup
        uses: hashicorp/setup-terraform@v3
      - name: Download Plan
        uses: actions/download-artifact@v4
        with:
          name: $-tfplan
          path: src/$
      - name: Prepare
        working-directory: ./src/$
        run: |
          cp -a ../../infrastructure/. ./
      - name: Prepare
        working-directory: ./src/$
        run: |
          terraform init -backend-config="key=$.tfvars"
          terraform workspace select -or-create $
      - name: Terraform Apply
        working-directory: ./src/$
        run: |
          terraform apply $-plan.tfplan
The main workflow it’s also simple.
- We do the same thing as with PR, just instead of pushing the plan to PR we save it to a file and upload as an artifact
- And then run
applyin a separate job. - We also marked the app job with an environment parameter, which allows us to enforce a manual review for production.
Go to your settings -> Environments -> Create
- Create for
dev - Create for
stage - Create for
prod
With prod, do the following to enforce a review
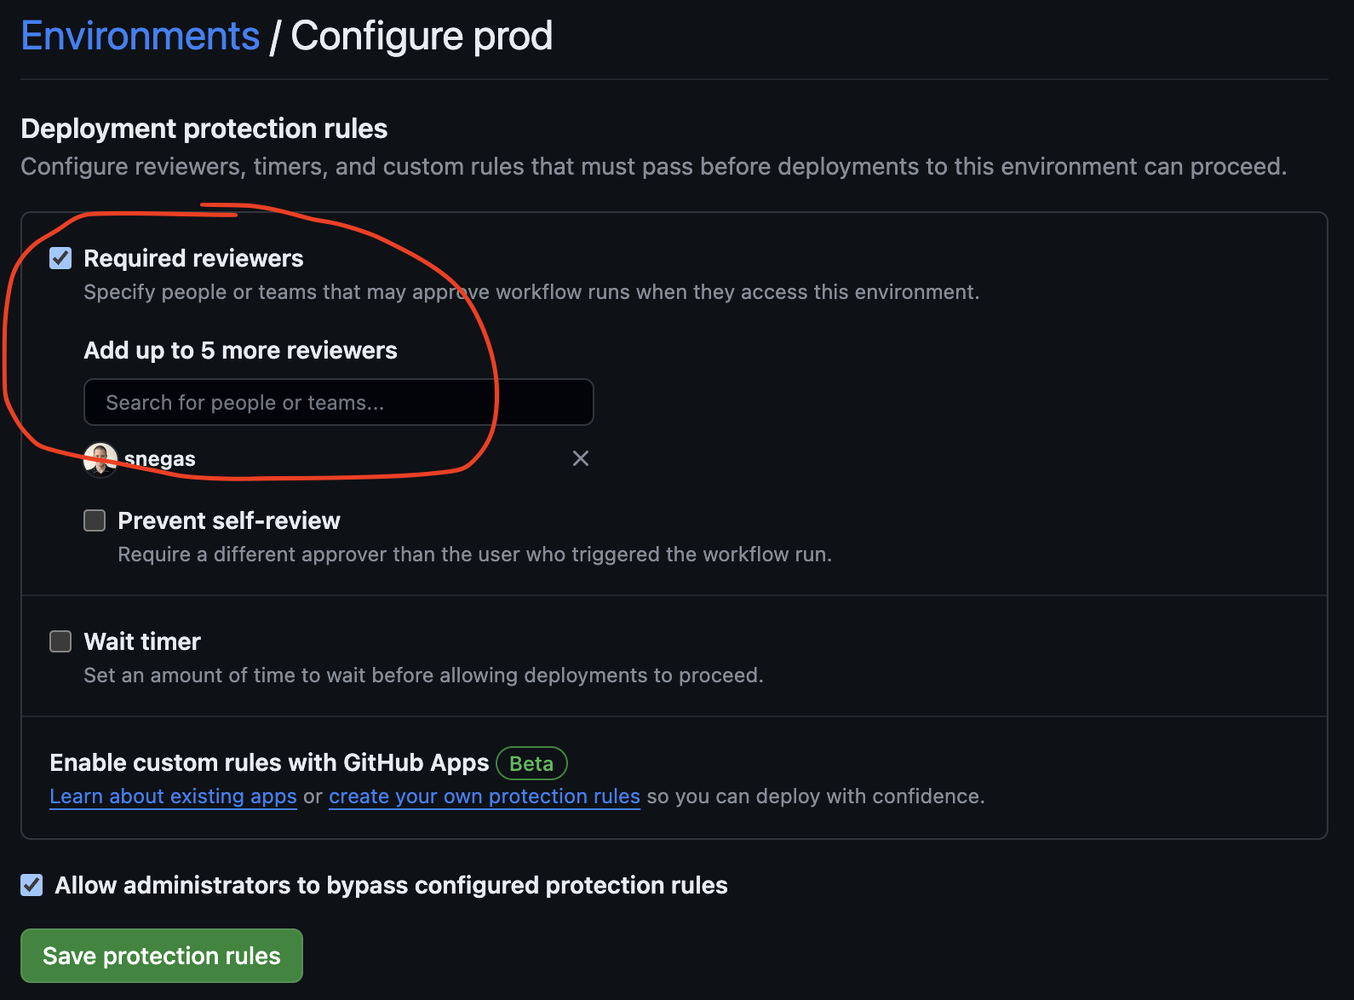
You then have to create shared-infra-pr.yml and shared-infra-main.yml in .github/workflows folder
Here’s the PR file
name: "Shared Infra PR"

on:
  pull_request:
    paths:
      - 'src/shared-infra/**'
    branches:
      - main

jobs:
  dev-workflow:
    uses: ./.github/workflows/_infra-pr.yml
    secrets: inherit
    with:
      project: shared-infra
      env: dev
  stage-workflow:
    uses: ./.github/workflows/_infra-pr.yml
    secrets: inherit
    with:
      project: shared-infra
      env: stage
  prod-workflow:
    uses: ./.github/workflows/_infra-pr.yml
    secrets: inherit
    with:
      project: shared-infra
      env: prod
We run the plans for all envs and push them to PRs as comments.
We also pass secrets into the child workflow.
Here’s the Main file
name: "Shared Infra Main"

on:
  workflow_dispatch:
  push:
    paths:
      - 'src/shared-infra/**'
    branches:
      - main

jobs:
  dev-workflow:
    uses: ./.github/workflows/_infra-main.yml
    secrets: inherit
    with:
      project: shared-infra
      env: dev
  stage-workflow:
    needs: [dev-workflow]
    uses: ./.github/workflows/_infra-main.yml
    secrets: inherit
    with:
      project: shared-infra
      env: stage
  prod-workflow:
    needs: [stage-workflow]
    uses: ./.github/workflows/_infra-main.yml
    secrets: inherit
    with:
      project: shared-infra
      env: prod
We got the dependency, we don’t want to apply straight into production, so we have to set the order. Firstly, it will be dev, then stage, and only then prod.
We also set workflow_dispatch which allows us to manually trigger this workflow.
Push it, merge it.
Here’s my PR where I got this working - link
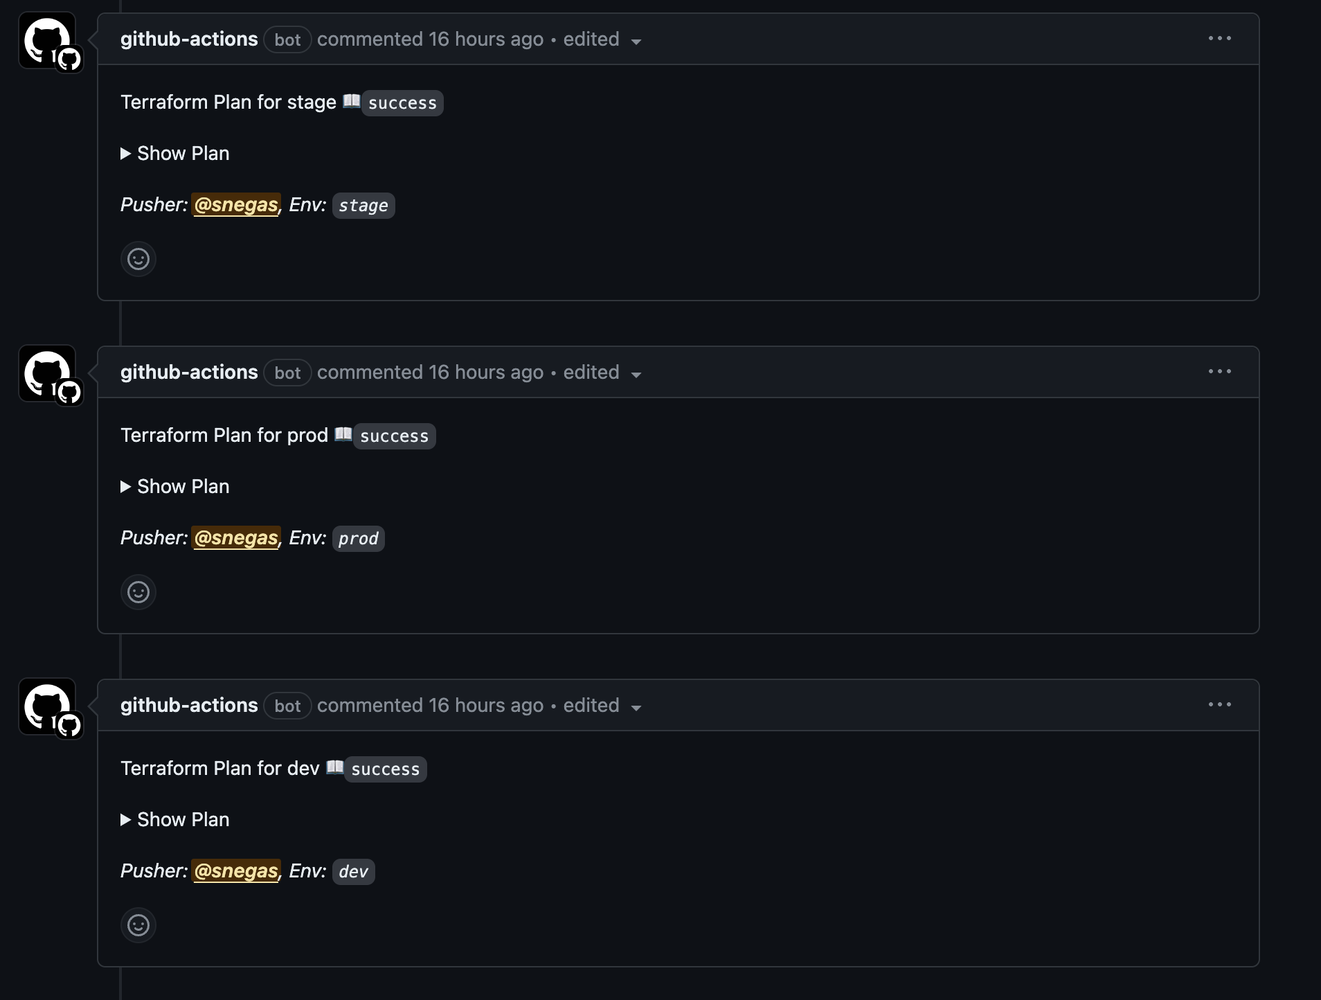
The plan for dev says this - link
Terraform used the selected providers to generate the following execution
plan. Resource actions are indicated with the following symbols:
  + create

Terraform will perform the following actions:

  # digitalocean_domain.default[0] will be created
  + resource "digitalocean_domain" "default" {
      + id   = (known after apply)
      + name = "dev.microservices-demo.devopsbasics.systems"
      + ttl  = (known after apply)
      + urn  = (known after apply)
    }

  # digitalocean_project.environment[0] will be created
  + resource "digitalocean_project" "environment" {
      + created_at  = (known after apply)
      + description = "A project to represent Development resources."
      + environment = "Development"
      + id          = (known after apply)
      + is_default  = false
      + name        = "dev-shared-infra"
      + owner_id    = (known after apply)
      + owner_uuid  = (known after apply)
      + purpose     = "Web Application"
      + resources   = (known after apply)
      + updated_at  = (known after apply)
    }

  # digitalocean_project_resources.environment[0] will be created
  + resource "digitalocean_project_resources" "environment" {
      + id        = (known after apply)
      + project   = (known after apply)
      + resources = (known after apply)
    }

  # digitalocean_vpc.default[0] will be created
  + resource "digitalocean_vpc" "default" {
      + created_at = (known after apply)
      + default    = (known after apply)
      + id         = (known after apply)
      + ip_range   = (known after apply)
      + name       = "dev-shared-infra-vpc"
      + region     = "nyc3"
      + urn        = (known after apply)
    }

Plan: 4 to add, 0 to change, 0 to destroy.

─────────────────────────────────────────────────────────────────────────────

Note: You didn't use the -out option to save this plan, so Terraform can't
guarantee to take exactly these actions if you run "terraform apply" now.
Note: I recommend removing - '.github/workflows/**' from all workflows to avoid rebuilding everything every single time :)
You get your pipeline running, and it looks like this:
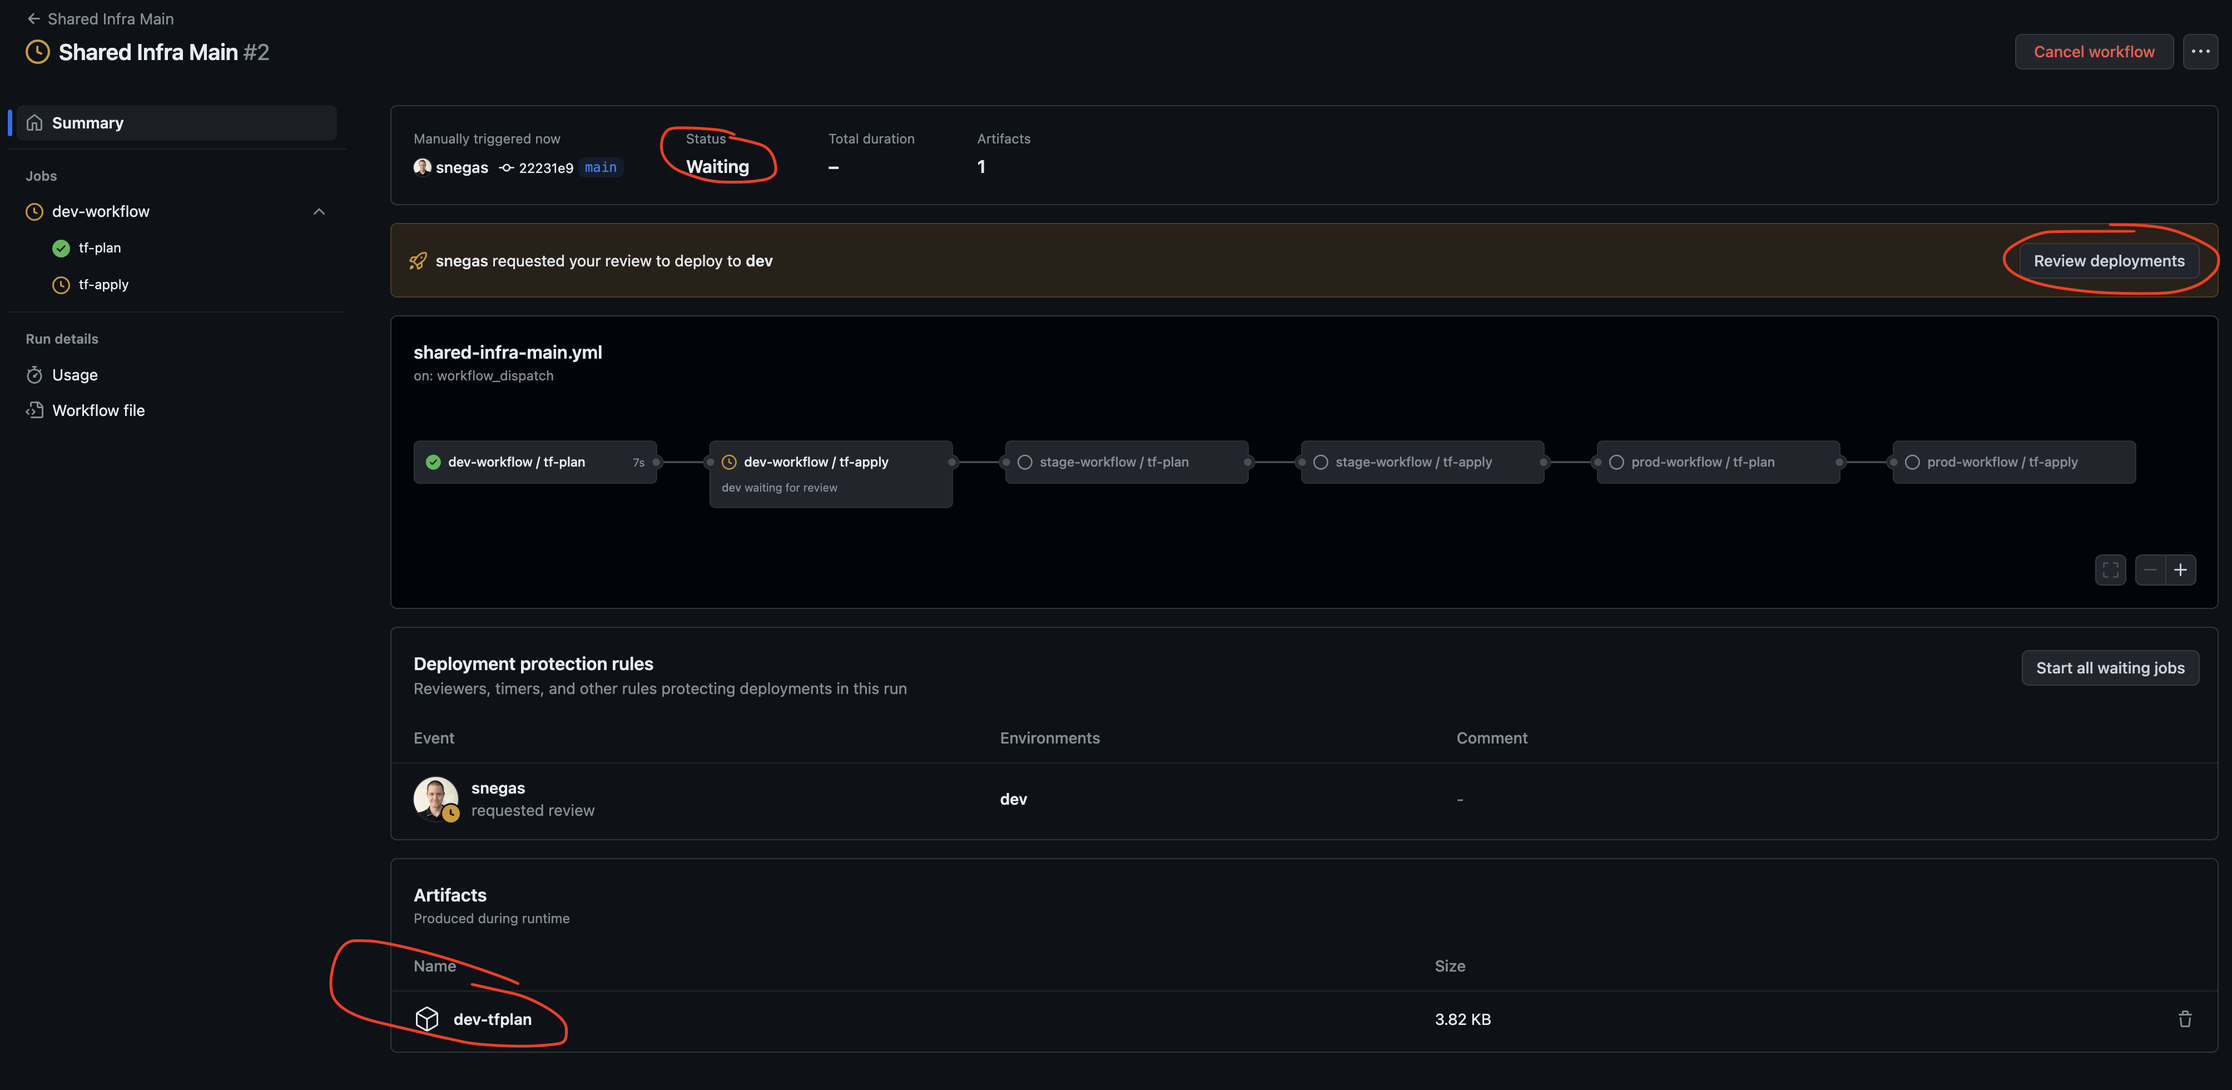
Hit Review deployments. Enter a comment, select environment, and hit Deploy.
Possible troubleshooting
A silly mistake I had to fix while developing this - link

And here is the pipeline that got me - link
Run terraform apply dev-plan.tfplan
digitalocean_domain.default[0]: Creating...
╷
│ Error: Error assigning resources to project b61a5a83-5f81-4ba4-8224-9b1c8889701a: Error assigning resources: POST https://api.digitalocean.com/v2/projects/b61a5a83-5f81-4ba4-8224-9b1c8889701a/resources: 400 (request "91705fce-da9a-4299-afd2-72b290f3e190") resource types must be one of the following: AppPlatformApp Bucket Database Domain DomainRecord Droplet Firewall FloatingIp Image Kubernetes LoadBalancer MarketplaceApp Saas Volume
│
│   with digitalocean_project_resources.environment[0],
│   on project.tf line 35, in resource "digitalocean_project_resources" "environment":
│   35: resource "digitalocean_project_resources" "environment" {
│
╵
digitalocean_vpc.default[0]: Creating...
digitalocean_project.environment[0]: Creating...
digitalocean_vpc.default[0]: Creation complete after 0s [id=55b764fd-95fe-49cc-a89b-d5ffc05a7f08]
digitalocean_domain.default[0]: Creation complete after 0s [id=dev.microservices-demo.devopsbasics.systems]
digitalocean_project.environment[0]: Creation complete after 0s [id=b61a5a83-5f81-4ba4-8224-9b1c8889701a]
digitalocean_project_resources.environment[0]: Creating...
Error: Terraform exited with code 1.
Error: Process completed with exit code 1.
Here’s what it tells me:
- A successful Plan doesn’t guarantee successful apply
- It’s good to have the same code for dev, stage, prod
- It’s good to apply in lower environments first
So, I got it fixed because the error is pretty descriptive, and here it is - link
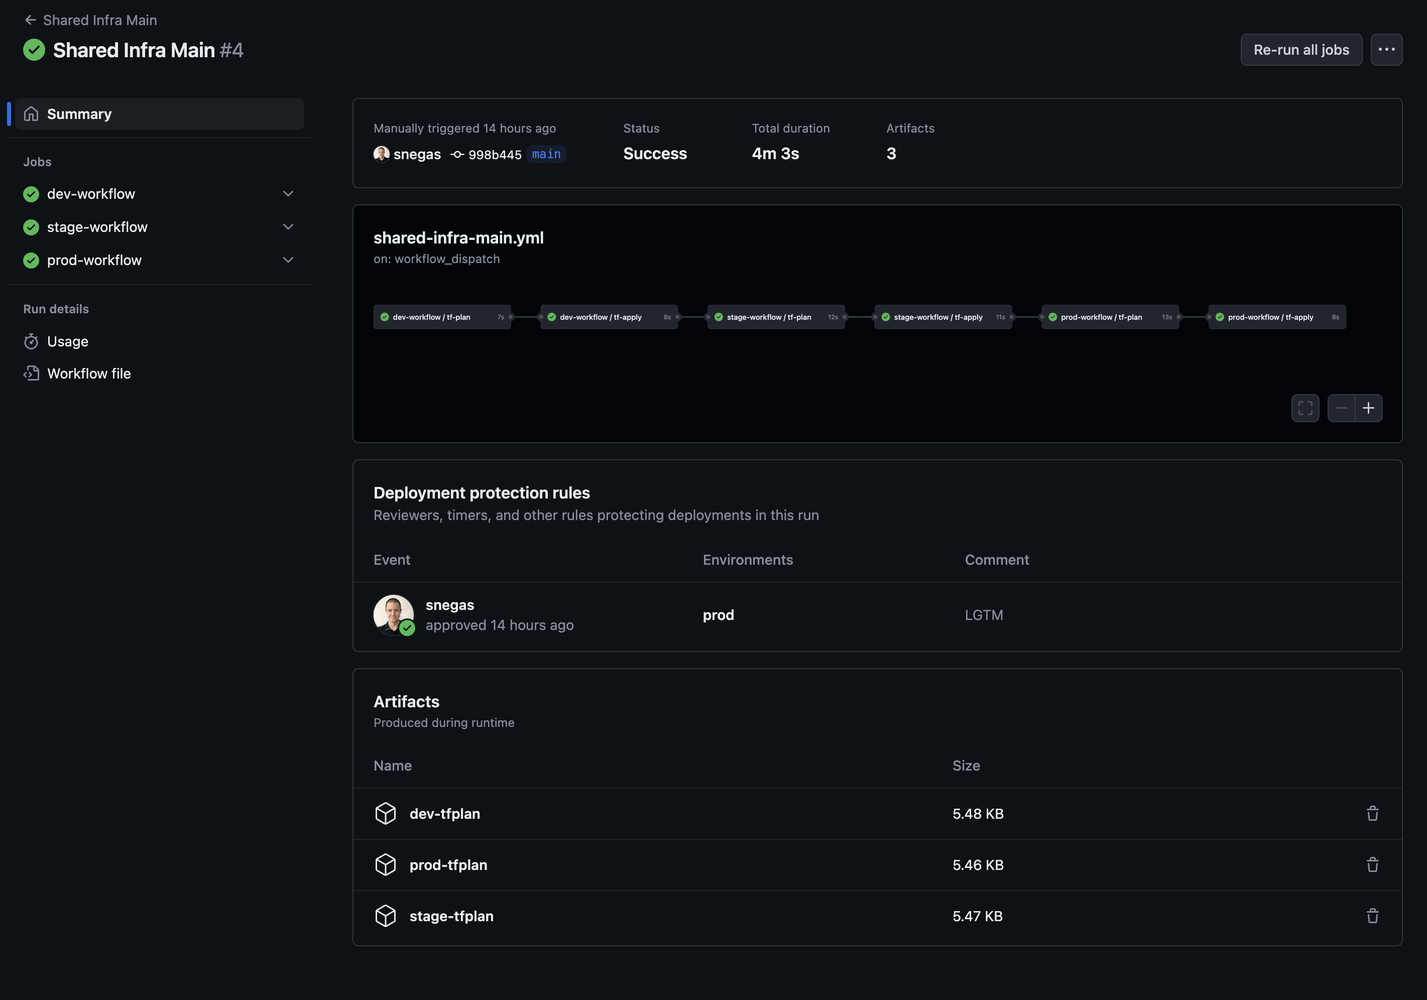
If you go to Digital Ocean, you see new things created:
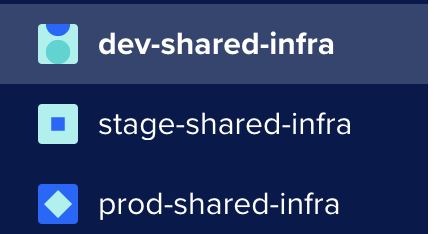

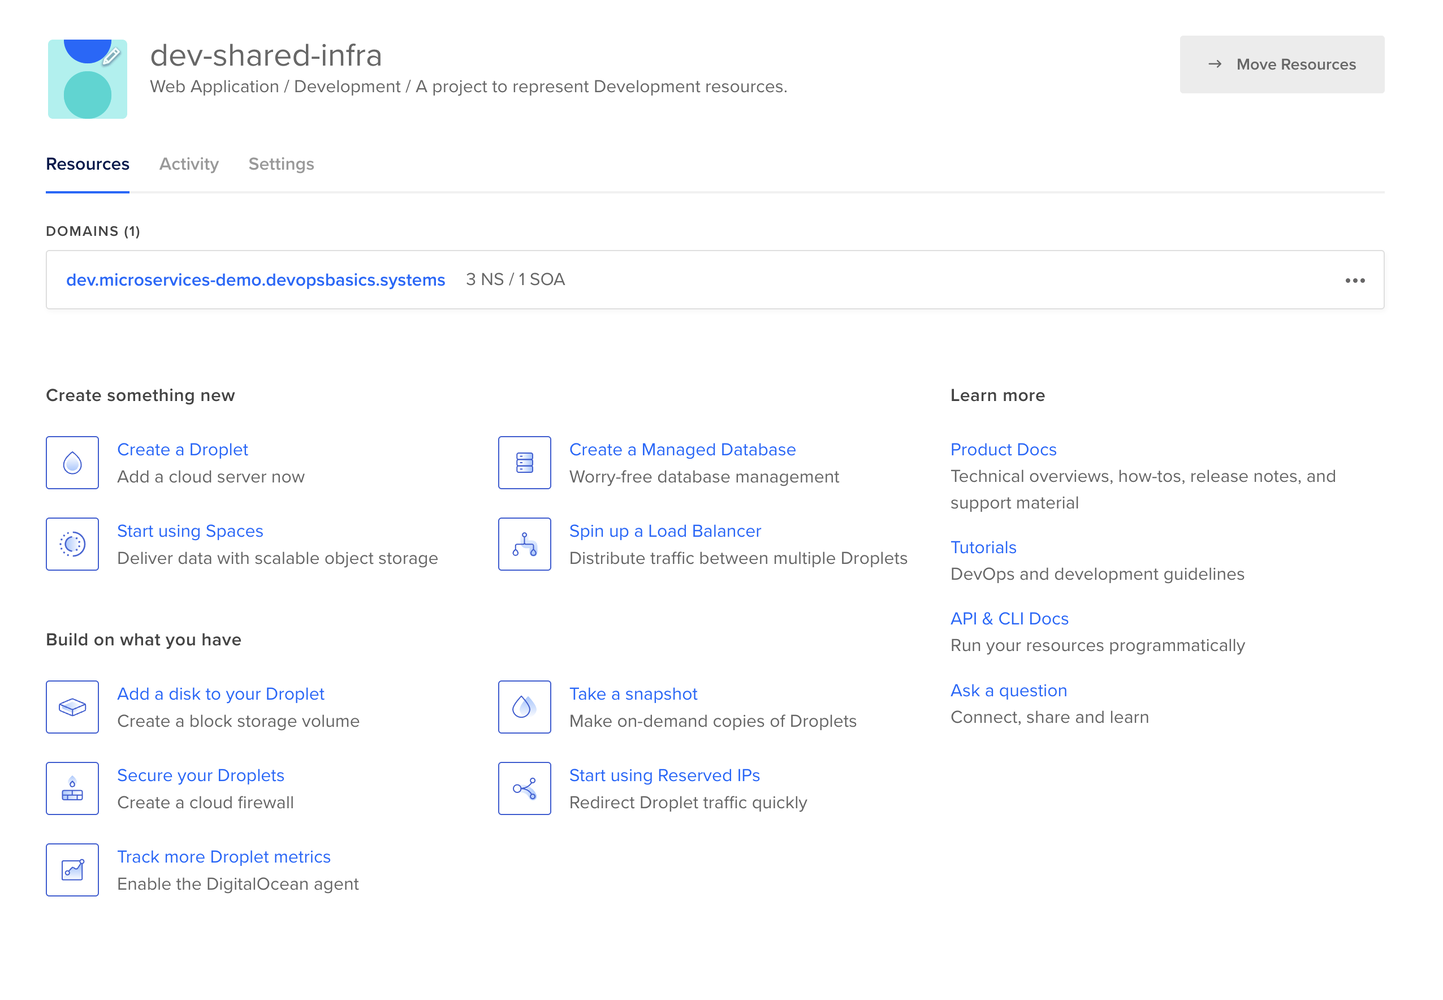
DNS!
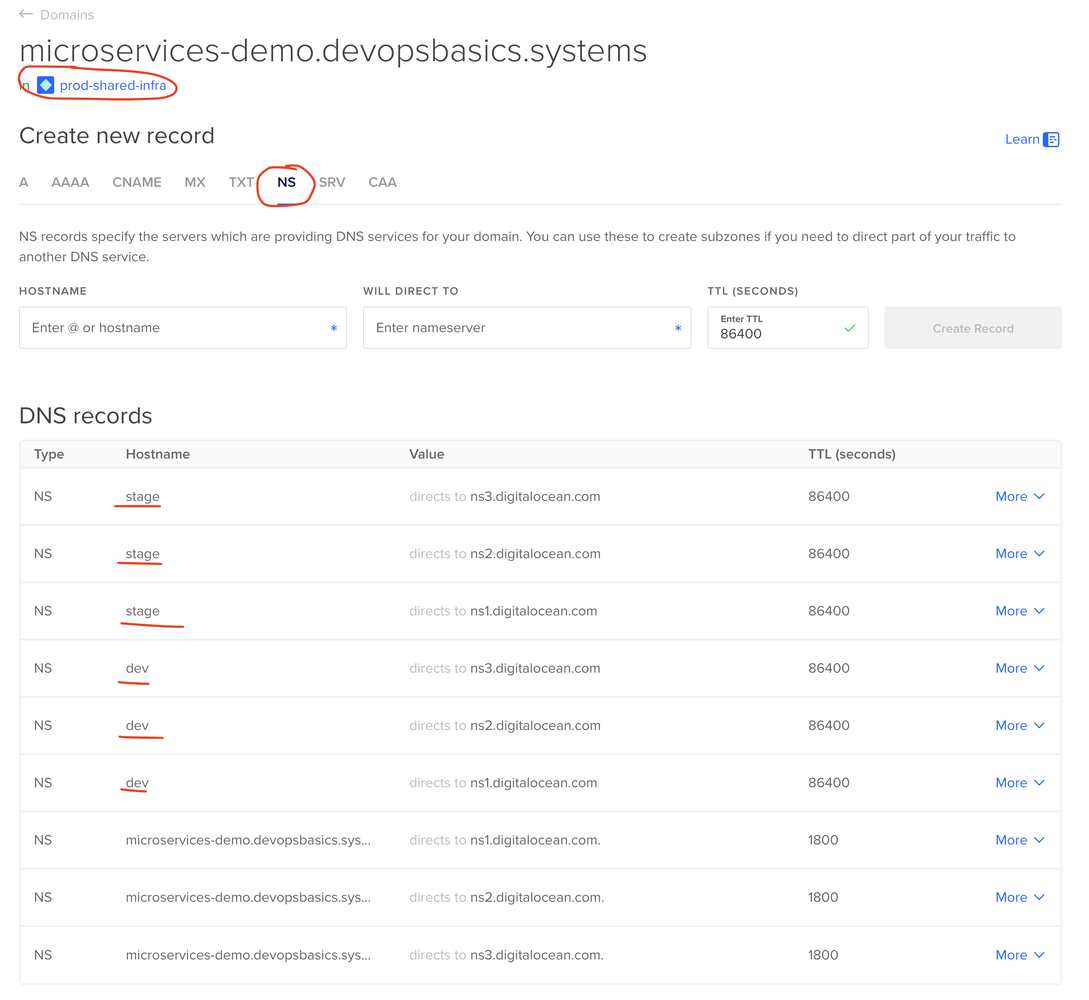
Now it’s time to delegate management of our DNS Hosted zones to DO
Go to your registrator and add an NS record for you base_domain
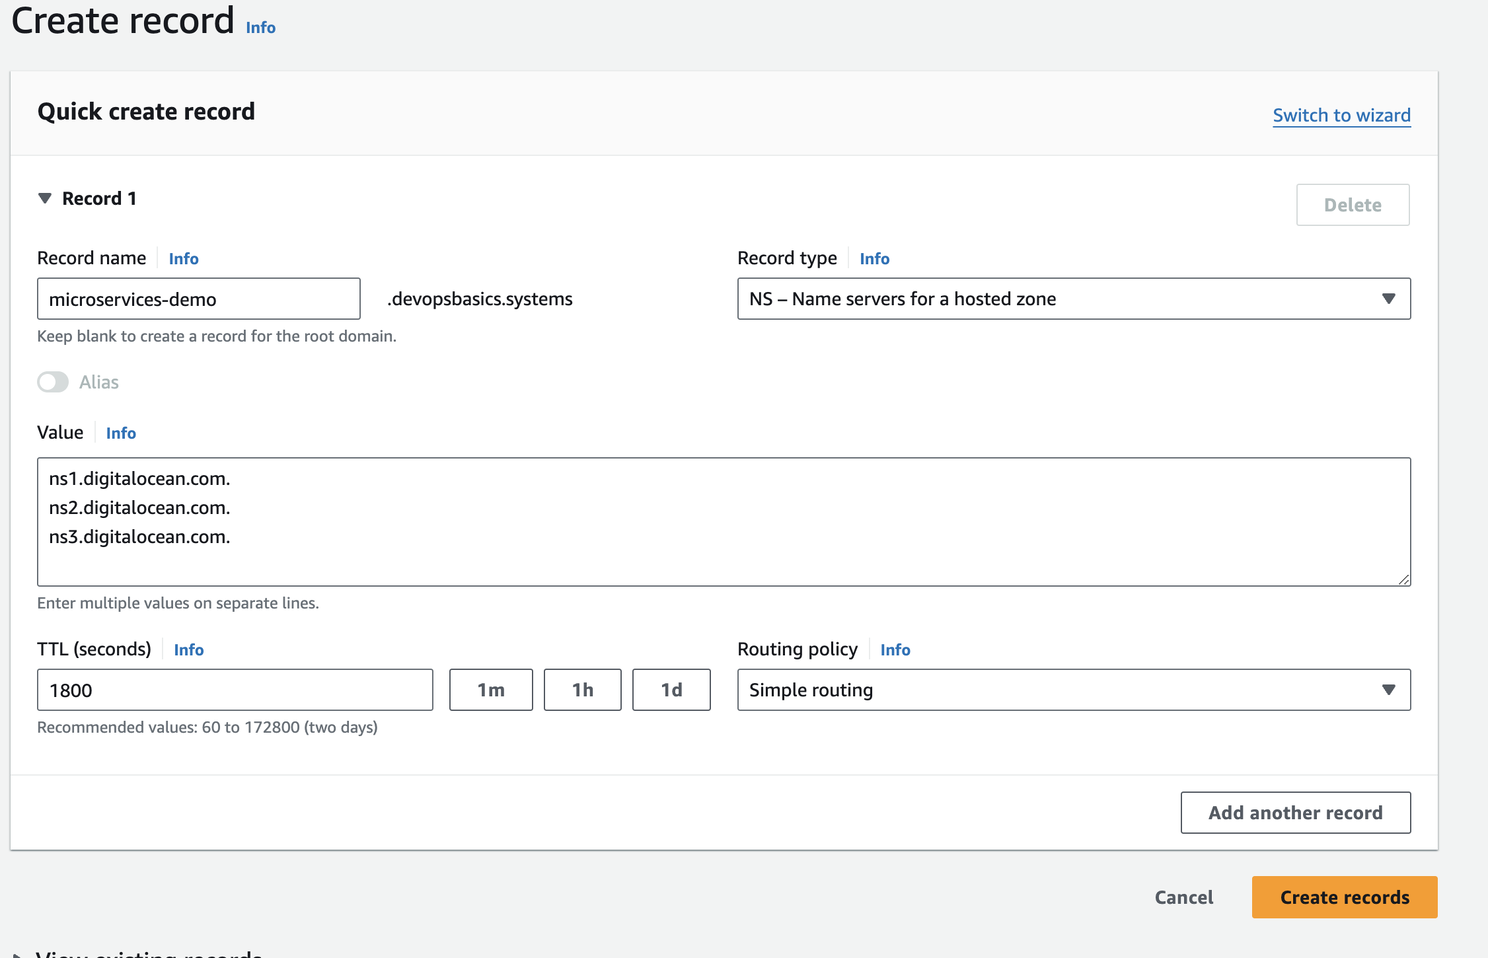
Then, let’s go do Domains in DO and update the base_domain to delegate dev. and stage. to the corresponding DNS Hosted zones in DO.
Coding Cart Service Infra
We start by adding app.auto.tfvars into ./src/cartservice
redis=true
prefix="cartservice"
So, we have our prefix. We don’t specify type and we want redis.
Let’s add the Redis variable into variables.tf in our infrastructure folder
variable "redis" {
  type        = bool
  description = "Do we need a Redis Cluster created or not?"
  default     = false
}
You can see that it’s false by default, so we don’t need to pass it in the shared infra and other projects unless we want to.
Let’s create app.tf in infrastructure folder
locals {
  is_app = var.type == "app"
  is_redis = var.type == "app" && var.redis

  all_redis_settings = {
    dev = {
      size       = "db-s-1vcpu-1gb"
      node_count = 1
    }
    stage = {
      size       = "db-s-1vcpu-2gb"
      node_count = 2
    }
    prod = {
      size       = "db-s-1vcpu-2gb"
      node_count = 2
    }
  }

  current_redis_settings = local.all_redis_settings[terraform.workspace]
}

data "digitalocean_vpc" "shared" {
  count = local.is_app ? 1 : 0
  name  = "${terraform.workspace}-shared-infra-vpc"
}

data "digitalocean_project" "shared" {
  count = local.is_app ? 1 : 0
  name  = "${terraform.workspace}-shared-infra"
}

resource "digitalocean_database_cluster" "redis" {
  count                = local.is_redis ? 1 : 0
  name                 = "${local.prefix}-redis"
  engine               = "redis"
  version              = "7"
  size                 = local.current_redis_settings["size"]
  region               = "nyc3"
  node_count           = local.current_redis_settings["node_count"]
  private_network_uuid = data.digitalocean_vpc.shared[0].id
  project_id           = data.digitalocean_project.shared[0].id
}

resource "digitalocean_database_firewall" "redis" {
  count      = local.is_redis ? 1 : 0
  cluster_id = digitalocean_database_cluster.redis[0].id

  rule {
    type  = "ip_addr"
    value = data.digitalocean_vpc.shared[0].ip_range
  }
}
- We have
localssimilar withshared.tf - Then, we fetch a VPC and a project via data resources.
- Then, we create a cluster where we pass VPC ID, Project ID, and some default configuration.
- Then, we also create a firewall, so only apps inside the network can access the cluster.
You have to create cartservice-infra-pr.yml and cartservice-infra-main.yml workflows, similar to shared-infra-pr.yml and shared-infra-main.yml (just don’t forget to rename project variables and some names).
Here are my files:
- https://github.com/snegas/microservices-demo/blob/main/.github/workflows/cartservice-infra-pr.yml
- https://github.com/snegas/microservices-demo/blob/main/.github/workflows/cartservice-infra-main.yml
You PR and merge it.
Here’s mine - link
Troubleshooting
I forgot to add prefix so it got my pipeline hanging for a while :) You can see this based on the commits history.
And I originally had a bit different locals
all_redis_settings = {
    dev = {
        size       = "db-s-1vcpu-1gb"
        node_count = 1
    }
    stage = {
        size       = "db-s-1vcpu-1gb"
        node_count = 2
    }
    prod = {
        size       = "db-s-1vcpu-2gb"
        node_count = 2
    }
}
After reading the documentation and seeing pipeline failure, I found out that you cannot create 2 nodes of type db-s-1vcpu-1gb. So I had to replace it with db-s-1vcpu-2gb for the stage environment.
Here’s the fix - link
I also forgot to add a firewall in the beginning, so I had to do another commit for it - link
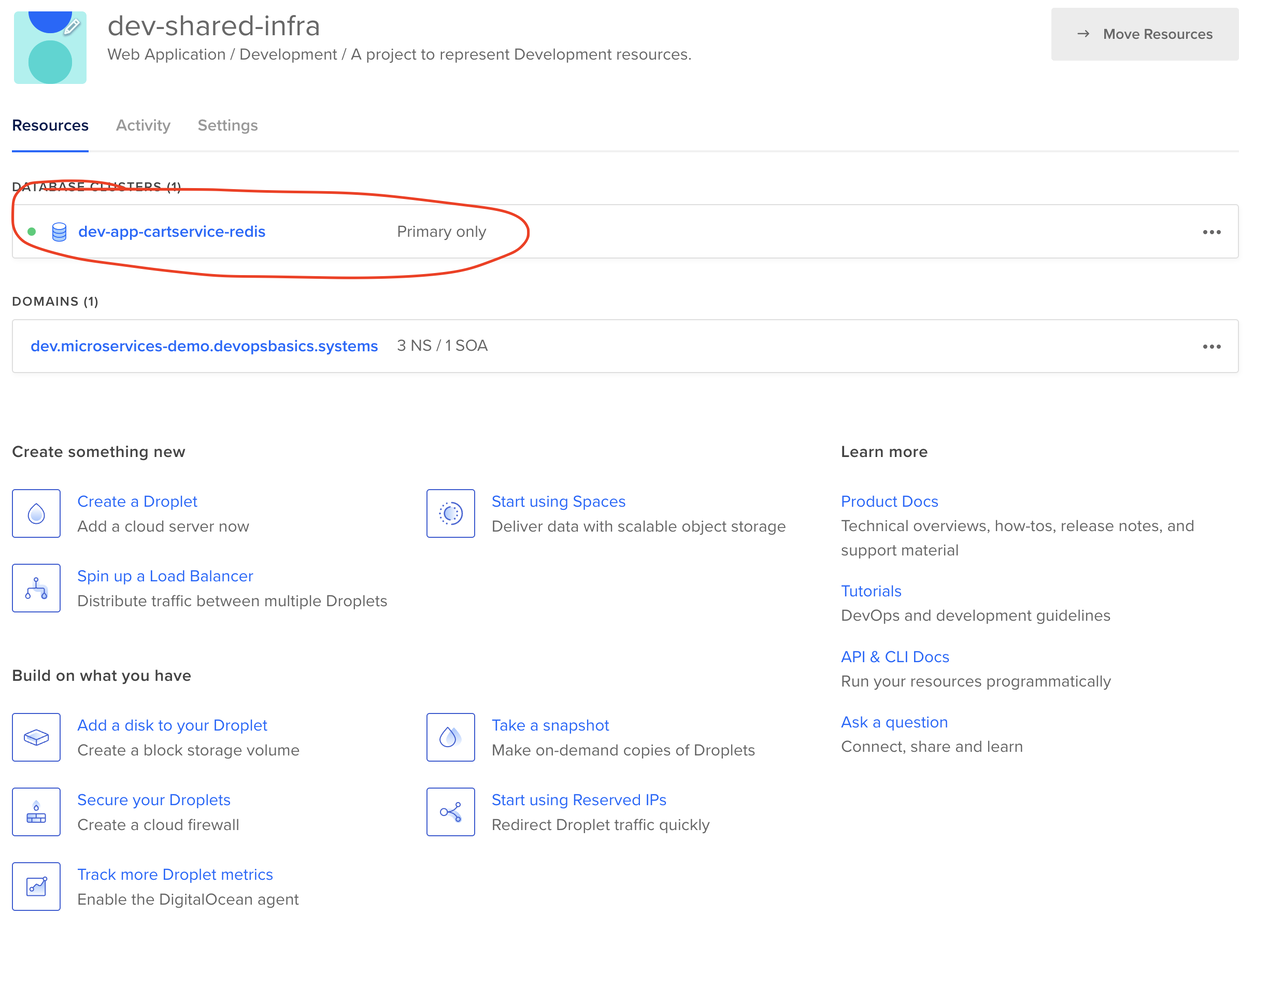
Here’s what you get in the Digital Ocean dashboard
Coding Frontend Infra
Let’s add app.auto.tfvars into src/frontend
external=true
prefix="frontend"
And let’s add this variable to variables.tf
variable "external" {
  type        = bool
  description = "Do we need to create a load balancer, https cert and a DNS record?"
  default     = false
}
You can see that it’s false by default. So, we don’t need to pass it unless we want to.
Now let’s extend locals in app.tf with the following statements
is_external = var.type == "app" && var.external

app_domain_name = local.is_external ? trimprefix(element([for i in data.digitalocean_project.shared[0].resources : i if startswith(i, "do:domain:")], 0), "do:domain:") : null
- The first one is just like Redis.
- The second one is a bit more interesting. We need to get a domain name for our certificate and the application.
Digital Ocean has a concept of IDs, similar to Amazon. So it’s a bit weird structure that looks like do:{type}:{name}. For the domain name, it is do:domain:{name}
Let’s add a few resources to make it work
data "digitalocean_domain" "external" {
  count = local.is_external ? 1 : 0
  name  = local.app_domain_name
}

resource "digitalocean_record" "external" {
  count  = local.is_external ? 1 : 0
  domain = data.digitalocean_domain.external[0].id
  type   = "A"
  name   = "@"
  value  = digitalocean_loadbalancer.external[0].ip
}

resource "digitalocean_certificate" "external" {
  count  = local.is_external ? 1 : 0

  name    = "${local.prefix}-cert"
  type    = "lets_encrypt"
  domains = [local.app_domain_name]
}

resource "digitalocean_loadbalancer" "external" {
  count  = local.is_external ? 1 : 0
  name   = "${local.prefix}-lb"
  region = "nyc3"

  forwarding_rule {
    entry_port     = 443
    entry_protocol = "https"

    target_port     = 80
    target_protocol = "http"

    certificate_name = digitalocean_certificate.external[0].name
  }

  project_id = data.digitalocean_project.shared[0].id
  vpc_uuid   = data.digitalocean_vpc.shared[0].id
}
- The first one fetches the domain name based on a local variable we got
- The second one creates A record that points to a Load balancer
- The third one creates an HTTPS certificate via Let’s Encrypt for the domain name from a local variable.
- The fourth one created the actual load balancer. Based on our environment, we also place it in a project and inside of VPC.
Here’s the PR I put in my repo for your reference - link
I got a few issues sorted out there as well to make sure we can execute all the other pipelines as well without any issues
- It’s not really a big deal, but I had to rename the state files because of a mistake in a filename (you also need manually rename the files in the bucket if you want to do it) - link
- I had to check wrap app_domain_name to ensure it’s not calculated during shared-infra (link) and cartservice pipelines. Here’s a link for fix link
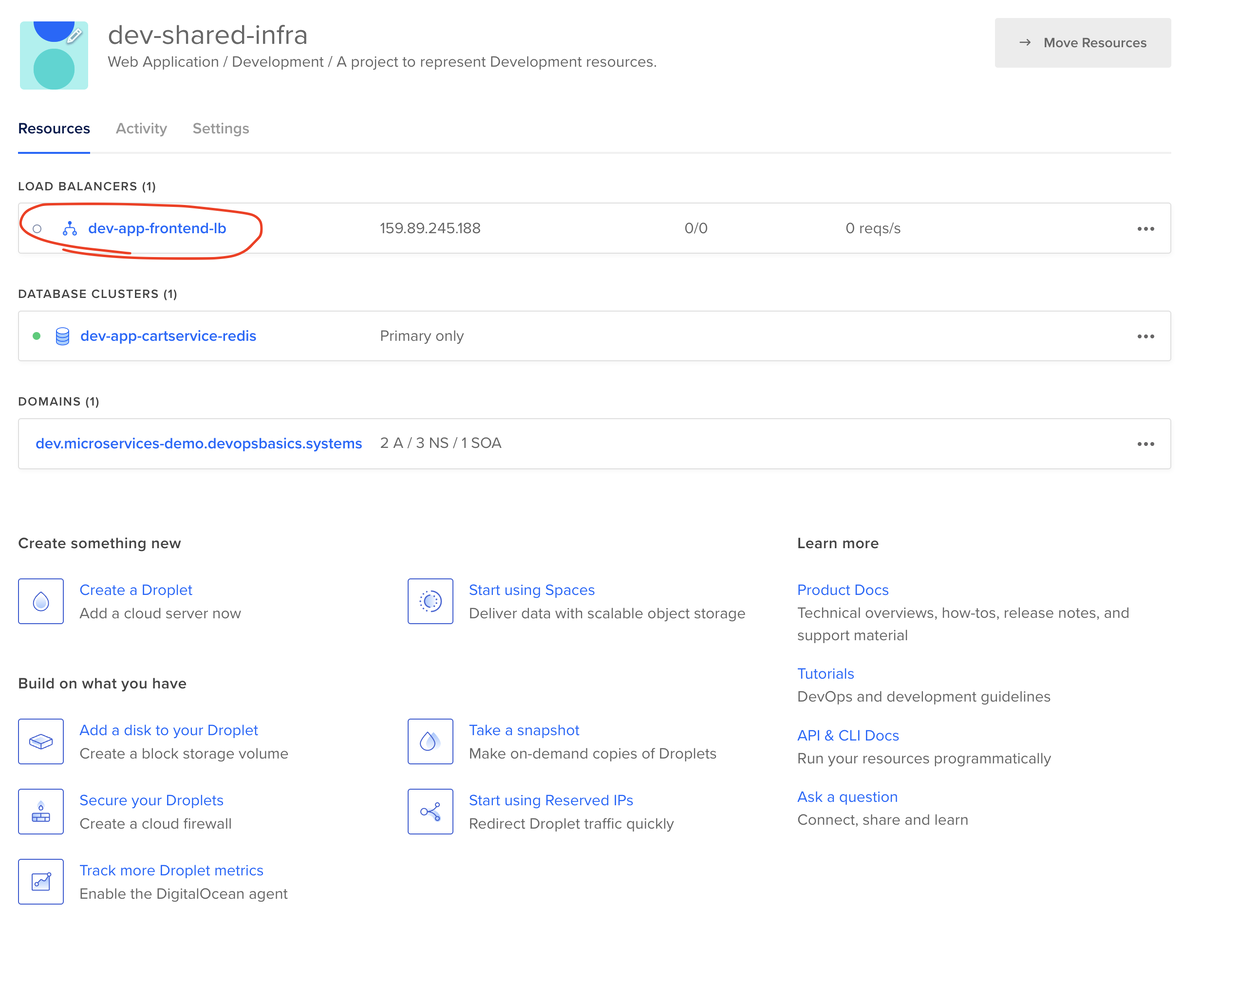
So, once you merge and run the code above, you get the following in your Digital Ocean dashboard
Conclusion
We got our terraform running. We created real infrastructure like you’d have in a real production project. But, we have simplified the configuration.
It’s OK to make mistakes. Terraform issues are not straightforward, so you have to google a lot :) and also read a lot of documentation.
In the next article, we’ll seamlessly introduce K8s so the existing apps won’t have to change anything on their side, except for some small configuration to incorporate a new deployment target.